
#FRIGHTFEMMES 2023 | Vol. Il DIY Halloween DIY Ember Burning Cauldron
- blonde2brunette

- Oct 6, 2023
- 6 min read

Disclaimer: This post may contain affiliate links. If you make a purchase through any link, I may receive a potential commission at no extra cost to you.
"Double, double toil and trouble: Fire burn, and cauldron bubble. By the pricking of my thumbs,Something wicked this way comes..." -William Shakespeare
Welcome back to another #FriGHTFREMMES Friday! On this October 6th, we are bringing you DIY projects for you to try at home. We've got beautiful bone chilling decor for your walls, a bewitched book we all know and love , and an ember burning cauldron to keep your hearth warm. We love make-up and cosplay, but equally love decor and know that our friends here new and old, also dabble in the occasional DIY. We've been sharing quick projects the past few weeks, but today's DIYs require a little bit more prep & time to complete. So cheers to the first DIY segments of Frightfemmes.
If you are just joining us, check out this year's PRACTICAL MAGIC intro post and what #Frightfemmes is all about. Last week we shared our SIREN MAKE-UP looks and delivered various ways to achieve the mysterious creatures of the sea. Want to take a deep dive of this collab and see ALL THINGS make-up and cosplay (80 plus makeup looks & Halloween costumes ideas and handmade threads) plus Halloween and fall DIY to create for your home via #frightfemmes of years passed CLICK HERE.
My favorite part, allow me to introduce you to the my beautiful friends and collaboration partners of #frightfemmes ...

DIY HALLOWEEN
- DECOR & PROPS -
Gothic Skull Wall Decor
Laura at @LauraJadePrado |Illustration Artist - Designer - Blogger - Sagittarius

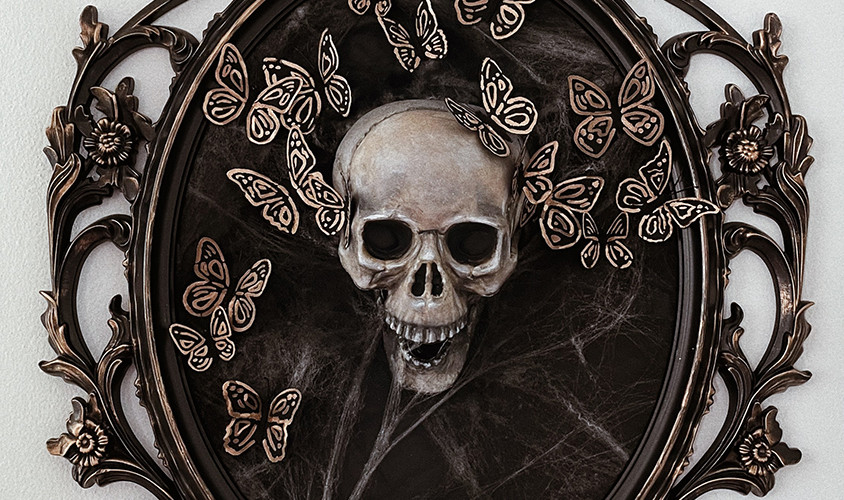


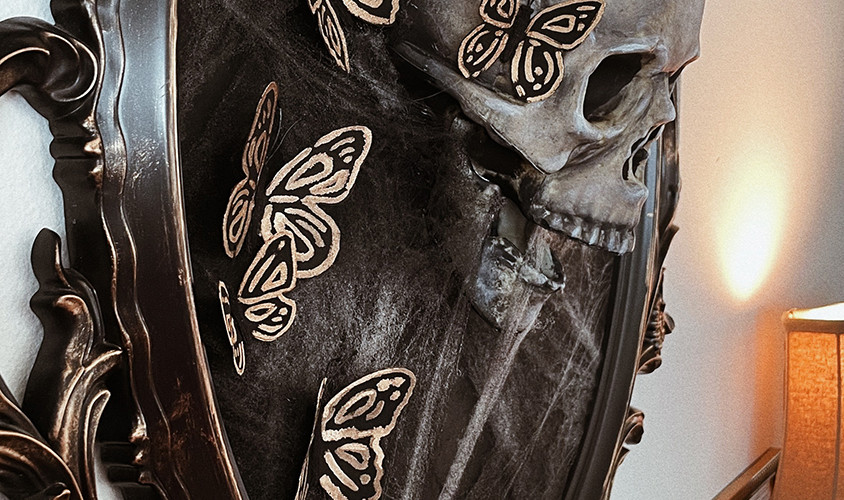


Laura created a beautiful bone chilling wall art piece. This 3D wall art is the perfect touch for all Gothic decor styles and then some. She shows you how not only how she makes it, but how she styles it among other DIY and thrifted pieces (peep the painted ghost frame). Anyone can make a DIY, but what makes them exceptional are the details! Look at how she snatched the Skull the make it pop! I'm definitely adding this project to my to do's for future gothic decor vibes. I also recommend checking out her other gothic DIY's as all the pieces combined would set the tone for your entire home! You'll want to read and pin her entire process via her blog HERE.
| Follow Laura's magic via her instagram: @theweekendgypsy , blog: laurajadeprado.com , shoppes: @TWG Designs + TWG Designs Site + The Weekend Gems , youtube: LauraJadePrado |
BOOK FROM HOCUS POCUS
Ruthmarie aka @the.vintage.raven | Vintage Enthusiast - Sewist - Vlogger- Capricorn


Ruthmarie actually made a living BOOK! Not just any book, but the book from Hocus Pocus. She took an animatronic and combined it with the keepsake boxes that are shaped as a book. The best thing about all of this was how she hand crafted the original details of the book and applied them to her Book! You'll love the whole process and will have to add to your DIY projects list as well, lol! I mean, I am!!! You'll want to read and pin her entire process via her blog HERE.
| Follow Ruthmarie's magic via her instagram: @the.vintage.raven , blog: The Vintage Raven, youtube: The Vintage Raven , shoppes: @preciselyplanners + RM Sewing Emporium , Spotify Halloween Playlist |
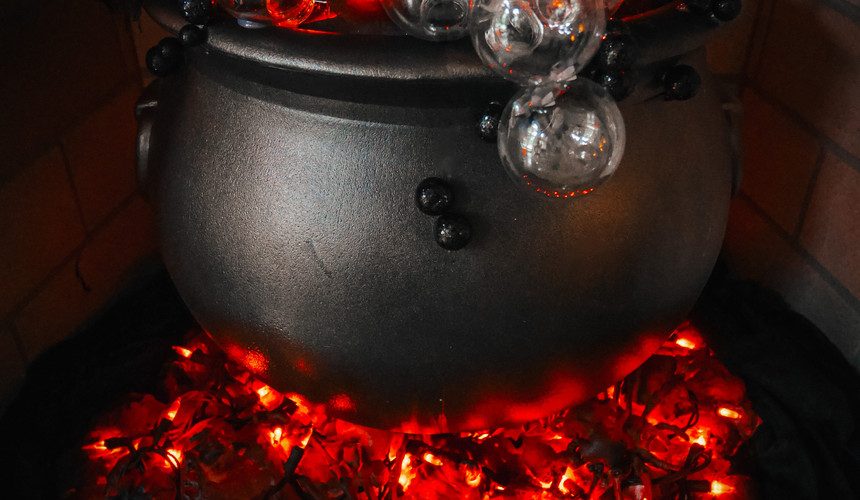
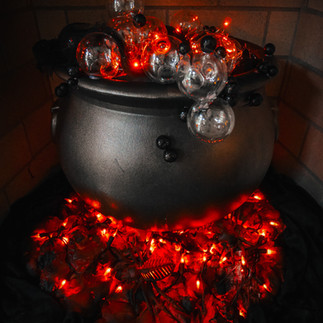
EMBER BURNING CAULDRON
By me, Caro aka @caropozo @blonde2brunette | Actor - Blogger - Creative - Virgo


| you can follow my trail of magic via instagram: @caropozo , lifestyle blog: @blonde2brunette + blonde2brunette , shoppe: @thesugarcottage_ + The Sugar Cottage , and youtube: blonde2brunette |
I've always loved a burning and bubbling cauldron and when different styles have circled around socials, I had to try my hand at making one. The main part that I wanted to have available as a prop was the burning embers. The burning ember part is my favorite. It's extremely versatile and can be used to set the mood for any haunted home. I created the pile of burning coals for the cauldron set, but I have seen them styled with bones and other props to create a scary scene in the yard, as a mantel cover, and most recently back splash for one's kitchen. Here's how I did mine...
DIY BURNING EMBER CAULDRON |
(For all your seasonal project organization needs, I have fun with my "Living Life Planner" created by Laura from her TWG Designs shoppe, CLICK HERE. For figuring out how to plan your makeup layout or cosplay from scratch, I use RMSewing Emporium planner sheets designed by Ruthmarie, CLICK HERE.)
MATERIALS NEEDED:
Find All the Materials in the Cauldron DIY idea list section of our AMAZON SHOP, CLICK HERE and get everything delivered to your doorstep! For more Halloween decor items I love and use click HERE.
Fire Burning Coal Pile |
Tite Foam
Spray Paint in Black & Red
String Lights (50-100 strand) in Orange.
Trash Bag
Optional- Bones, Skeletal Figures
Cauldron |
Spray Paint color of your choice (if not sticking to black), I used bronze tone.
Plastic Christmas Ornaments
Black Spray Paint
Heavy Brown Kraft Paper for filling
Fairy Lights - In Orange or Purple or mix.
Optional- Added decor of your choice (I added black glitter Styrofoam spheres, black cheese cloth gauze material)
Hot Glue Gun and Sticks
Process | Reference the reel for a visual play by play HERE.
Begin by grabbing a trash bag to be your base of where your burning pile will be. Get an idea of the base size of your cauldron. You'll want to increase the size at least 6 inches to see it underneath. Spray your foam and make a "circle" this does not have to be perfect, just a nice loppy layered look works well. You'll then add in your lights, followed by any skeletal bones of your choice. Allow this to cure. Depending how thick the foam layers are, it could take for the top outside to dry in 30 minutes or more. Once the top part is dry, you can move onto spray paint.

Start with Red, then black. Little bit at a time to create movement. Imagine yourself at a bonfire and how the flames dance and burn some areas versus others. Due note to keep the trash bag underneath over night for the internal and bottom layer that isn't exposed to air to dry. Once it's dry you can easily peel off the trash bag to reveal only a foam bottom...


While your burning pile is drying, let's move onto prepping your cauldron. First spray paint whatever tone you want your cauldron to be. I spray painted a brass tone. I then stuffed the cauldron with thick kraft paper. Soon you'll be layering in bubbles, you'll want a surface for them to stick to across the rim and inside of the cauldron. Spray the brown paper part with black spray paint...(scroll through images for a deeper look)


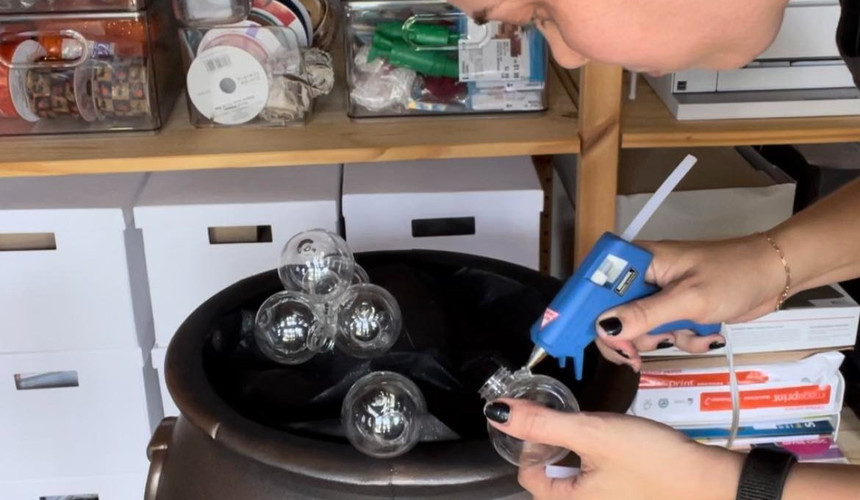


Now begin the bubbles. Start with a few clusters and then add in the rest. Glitter spheres and gauze fabric material. I then hid the battery case of the fairy lights under a small piece of black gauze fabric, adding more texture and layer and was able to only allow the glowing orange lights intertwine with the clear plastic Christmas ornaments.
As you look at the finished product below, I feel like there is an opportunity to add critters, eyeballs and more. Even add a different color of fairy lights too!
Now to put the two together...
makes for a magical looking Witch's Cauldron!
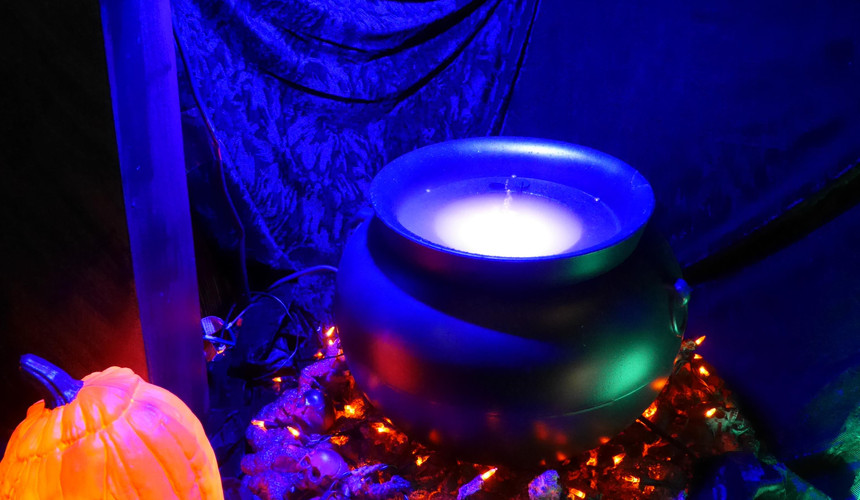
* Please note that below I am showing you two types of cauldrons below. One that we decorated with bubbles and fairy lights, while the other is the fogging style (you can find also in out Amazon Cauldron DIY list)! For the last four years, my sister and I have planned Halloween decor for our family's business and this year was witches. So I was able to make two sets of ember burning pieces and try a fogging style cauldron. The bubbling one I made for my mother's home is to match her goth glam pieces she has collected over time...


I hope you enjoyed the first round of DIY projects. Stay tuned for more and for all things spooky and also cozy Halloween vibes, be sure to follow the official #frightfemmes instagram account HERE. To see sneak peeks of projects for the season on the daily visit our main insta handles @blonde2brunette & @caropozo. For any pinning action visit our pinterest Halloween board HERE. See y'all next week!

Happy Hauntings,

Don't forget to pin this for later as you this year's Halloween costume! #frightfemmes #frightfemmes21 #halloweenmua #halloweenmakeup #diyhalloweencostume


Comments